Tuesday, 6 March 2018

Google Customer Lists- How to set up from scratch?

So, you have a big databse of people who have opted in for your emailer program or say subscribe to your newsletter? Why not reach these where they are on the web and target them with your ads? You ads can be targeted to all or you can segment them.

How to do it? Well, you need to use Google Customer list feature in this case.

How it works? (image source- Google)


When can you use it?

Examples:


  • You collected information from a customer who had purchased an item from your website.
  • You collected information from a customer who registered to receive marketing messages through your apps.
  • You collected information from a customer who signed up for your loyalty program in your physical store.


Where to start?

Go to Shared Library > Select Audiences >and Select ;Customer Emails

Click on Customer emails


  1. Select the customer email list name
  2. You have an option - upload the list directly or you can use the custom combinations (see below this image for custom combinations options)
  3. Select the membership duration- What does it means? Membership duration lets you decide how long an email stays on your list. Customer email lists by default don't expire, and will be set at the maximum duration. AdWords will send an email to let you know when your lists need to be refreshed. Make sure to remove people who unsubscribe from your Customer Match data files. 
  4. Select the main description and insert the details 
  5. Finally , click upload and save list


Custom combinations

If you select custom combination option, below will open


You now have the opportunity to use multiple combinations. For example, I can use Summer Data Remarketing list with this campaign 


So customer email lists is a powerful strategy, just remember to follow Google's privacy and data policy, only use the customer list that have already opted in. DO NOT buy the database form 3rd party and use.

Also, please read the Restrictions on sensitive information and What happens if you violate Google policies on this page


How will your customer list looks like?


Bonus:

You can create similar audiences from your customer audiences once they meet the minimum criteria. This is another strategy to find customers that are similar to your current audiences. You can target a similar audience the same way you'd target a remarketing list: by adding it to an ad group in your campaign.


Thanks for reading!

Facebook Automated Rules- Work Smart, Save Time and Become more efficient Campaign Manager

Facebook allows you to setup automated rules and thus optimizing your campaigns in a more smarter way. Lets say, you are going on a holiday and you are concerned that your target CPI should not go above say $2, you can set up the automated rule to pause the campaign whenever the CPI goes above $2- Relax your Holidays!!!! and let the Facebook automated rules do all the heavy tasking for you


Basics

Facebook Automated rules can be created at 3 levels:

So how should you go on creating your first rules?

Go to the Drop-down on the extreme left and select 'Automated Rules' option

On the top right you will see a button 'Create Rules' <<Click on that and the below window will open

So how to understand the below:


  1. Apply rule to : You can select where you want to apply rule- available options are: All active- Campaign, Ad Sets and Ads
  2. Action- What is the action you want when the rule should trigger- currently you can Turn ON/OFF the above (based on the selection in point 1), Adjust budgets and Adjust your bids (more details will follow in this article below)
  3. Conditions- These will be used to evaluate if the rule's action should be taken on each of your selected campaigns
  4. Others- You can select the time frame, adjust the attribution window, adjust the notifications and also opt in for email for yourself and also can add others (you should have the admin rights to add)


Lets get into Details


Action

Below actions are available- Below is an example when you have selected the ;Apply Rule to' at Campaign level. for other options, the actions might differ. I would recommend youto set rules at Ad set and Ads level once you have completed this exercise

Actions Options


\


Conditions Options (please note that there might be more options under each, not all are visible as there is a vertical scroll bar which limits the screen-grab area)


On top of that, once you have selected the above , you can then set the other condition as stated below


Time Range options


Attribution Window Options


Custom schedule Options


Other setting Options


Sample Rule- Example

Now that you have learnt how to create rules, below is pausing all the active campaigns when the budget is greater than $50. So as soon the budget reaches above $50, the campaigns will automatically Pause.


Facebook Audience-Complete Guide -Everything you wanted to know!

Facebook offers different types of Audiences for you to target in you advertising campaigns. Please see the details below:

1. Core audiences- Facebook owned audience/data and actual people- Select your audience manually based on characteristics such as age and location.

2. Custom Audience- Your 1st party data or Upload your contact list to connect with your customers on Facebook.

3. Lookalike audiences- Use your customer information to find people similar to them on Facebook.

4. Saved audience- You can create the audience and save them for all the future use.

Lets look at the ways and places you can find and create audiences. So basically, there are 2 places where you can create audiences

First option  You can do it while you create the campaign, it is available at the campaign level.


Second option

Go to the below and click on the drop-down and select Audiences


You can create audience by clicking 'Create Audience' button as shown below


Please note that once you have created the audience (you will see below how to do it in a second) - you can see the type of audience (custom or lookalike etc), its size (number of people in it- as FB measures real people and not cookies unlike Google do), Availability (whether the audience is ready to be used in the campaign or not or is it still under progress of updating etc) , Date created and whether or not , it has been shared with any other account.


Lets now click on the Create Audience button


CUSTOM AUDIENCES


Lets start creating Custom Audience first

you can see in the red box, these are the options available for you to create custom audiences


Lets dig deep into the details

Lets first click on Customer file

You have  3 options:


  • Upload your list in .csv or txt format
  • Import from Mailchimp ESP directly
  • The 3rd one - LTV customers- this is the latest update and is very useful in case if you you are looking for lookalike audience similar to your high LTV audience


Lets click on first option. Its a 4 step process, just upload the file in the above format, select your audience name and click next. In the next step, you will be asked to map the data- for example -if your file contains name , email and telephone number and you want to use name and telephone number, click on that. After that just click next and then your audience is ready to use.

Please note that after you perform the above step, it takes some time for the audience to reflect, till the time it is processing your request, you will see a notification in the Audience availability column.


In the above example, you can currently use 15 identifiers as shown below


Similarly you can create the other 2 audiences. For mailchimp, you need to connect it to your Facebook account


Now lest have a look at Website Traffic audience


Click on the option - see red box above


You can include people who meet the criterias as stated, maximum timeframe for lookback window is 180 days


Further you can include more or exclude specific audiences. Name your audience after selecting the criteria and then click create audience and Voila! your website traffic audience is ready


Now lets have a look at the third type of custom audience App Activity


It is similar to create the website audience, very simple and straightforward


Now lets have a look at 4th option- Offline Activity


Select the criteria and name your audience. then click Save. You are done!!!!


Now, lets see the last Custom audience Engagement

You can create custom based on -Videos watched on FB, people interacted with your lead generation campaigns and forms,people who have interacted with the full screen or canvas , people who has interacted with your FB or Instagram account etc.


Some of the things you can do is

Videos (max 365 days)

Lead forms- maximum 90 days


Full screen experience- maximum 365 days


Facebook Page- maximum 365 days


Instagram Page- maximum 365 days


Events- maximum 365 days

LOOKALIKE AUDIENCES (short form- LAL)

Lets have a look at LAL Audiences


You need to have a source or the seed audience- this is required because FB will look at the seed audience and based on that will create the lookalikes. After that, you need to enter the location- country in this case.

The next step here would be to click on the advanced options in Audience size, it will look something like below when clicked


Audience size 1 is the for the most relevant and have higher accuracy while 10 is not that relevant but is used for the reach side of the spectrum

Note: Once you finished creating the above audience, use the tiered exclusion strategy. For example if you create 5 audience: 1%, 2%, 5%, 7% and 10% , then exclude 7% from 10% , 5% from 7% audience and so on. This will make sure that your audience is not getting overlapped.


SAVED AUDIENCE

Now lets have the look at the last type of audience which is saved audience. This is basically a kind of audience that you want to create before you start the campaigns- this can be a time saver and can be used in multiple campaigns without having to create audience from scratch


Click the Create Audience drop down and select Saved Audience

Just fill all the fields as marked in orange as shown below, once done hit save and your saved audience is ready.


If you have any other questions specific to Audiences, please comment below so that I can help and assist you.

Thanks a lot for reading.
Sarang


Universal App Campaigns- Made easy for you!

Google launched Universal App Campaign in 2015, however in 2017 the old version of App Install was discontinued and UAC replaced it.

Some key points here to be noted:


  1. You do not have to design ads, creatives, copy etc. All the heavy lifting is done by the Google- You will see how simple it is to set a UAC campaigns underneath
  2. Available inventory- Google’s largest properties including Search, Google Play, YouTube, and the Google Display Network.
  3. How to start? Just add a few lines of text, a bid, some assets, and the rest is optimized to help your users find you.


Step by Step Guide (Adwords Old Interface guide)


Select Universal App campaign from the dropwon

Make sure your Campaign name is clear and easy to understand

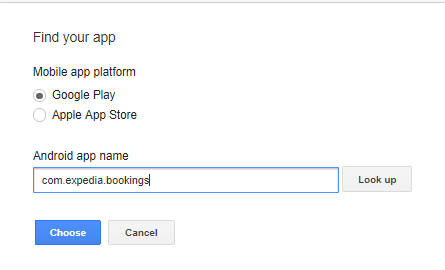
Under the Select App, click on that. You will have 2 options  to select from- Google Play or Apple App store. 

I recommend to create 2 separate campaigns- 1 for each operating system type. One campaign for iOS and 1 Campaign for Google Android. Keep in mind , if you run your campaign in multiple countries or in multiple currencies- create separate campaign for each Geos/currency and also make sure you follow the other best practices like Localization etc.


Once you click on the Select App, you ave 2 options- to select an app you used previously or if you want to select New app, you can see the below screen


For this Tutorial, we will use the example of Expedia


Just select the app from the list and click 'Choose'


Now this is where the magic starts

App icon, App name and Developers name will be auto generated

On the right screen, you can see the preview of how your ad will look like

You can write upto 4 headlines- make sure they work in standalone format- i.e. all the Headlines should convey message independently and should not be dependent on each other. You can get the text idea directly from your app store description or you can customize it as per your need. So it highly flexible.

You also have an option of adding 1 Video and upt0 20 images- this is highly recommended. Google randomly chooses the images and after certain time, once it has the data for bext performing images and Headlines, it will use those best formats.


After this step, you can select the location and Language- as you do in the other Campaign objectives - like search and display


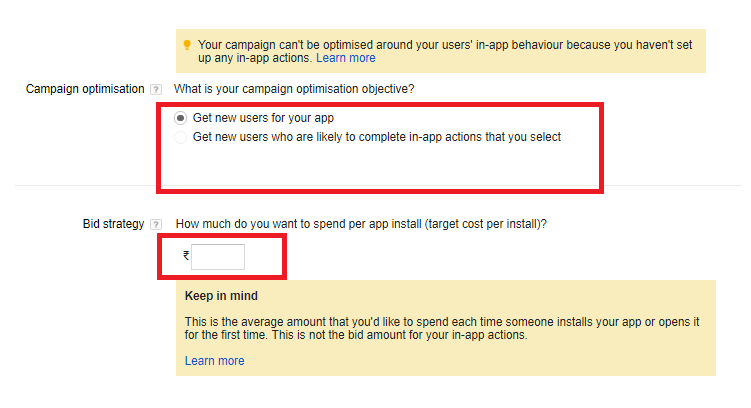
Once done, you now have to select the bidding option. Here you have 2 options- 

You can select (i) Get new users  (ii)Get new users who are most likely to perform - for the user in app behavior , you have to set in app actions and then once it is implemented successfully , you can use the second bidding option.


Once you have selected bidding option, in our example, we have selected ' Get new users',  you have to then set the CPI or Cost per install you are willing to pay per app install.  

Last but not the least, select the Budget. To see the estimate ad installs, you need to connect the Adwords and Google play account


Once you have done the above click 'Save and Continue'. In the next step, you just have to make sure that the conversion tracking is enable.

So, to create a Universal App campaign, you just need 5 minutes. No need to worry about creative, copy, text etc.