Sometimes the most important conversations don’t happen on blogs. Forums and message boards can host conversations about your company and you’d never know about it. Don’t panic! Sites such as Boardtracker.com will keep an eye on popular forums for you and alert you by RSS if yourcompany is mentioned in a thread.
Europe based Global Performance Marketing Professional | Markets: India, SE Asia, Europe, Middle East & North Africa | Agency, Client-side & Consulting | Full-funnel B2C, B2B & D2C | Budgets: 5-figure € to €3M+/month | Led teams: 4–15 members | AI-enabled Optimization | Industries: eCommerce, Fashion, Beauty, Lifestyle, FMCG, FinTech, SaaS, Tech, Education, Hospitality, Real Estate & Healthcare | Scaling acquisition & retention | Focus: ROAS, CAC, LTV & Revenue Growth.
Tuesday, 22 November 2011
Thursday, 17 November 2011
Excellent combination of ATL and Digital Advertising Mediums :Good ad by Reliance Mobile
Just saw this ad on the website www.afaqs.com . This Ad appears on television as well. Now they have leveraged Digital as a medium to integrate both the mediums viz : Above the line (ATL) and the Digital. I am sure you will like it. Please have a look...
The ad plays up when the website opens:
1: The lady appears on the right hand side of the screen
3. Finally the ad stops when she says 'Aur Aapka'
4. To see the AD again, you need to replay it using a replay button:
The ad plays up when the website opens:
1: The lady appears on the right hand side of the screen
2. Then, the lady appears on the left hand side of the screen
3. Finally the ad stops when she says 'Aur Aapka'
4. To see the AD again, you need to replay it using a replay button:
Wednesday, 16 November 2011
RewriteRule syntax explained
For a simple URL makeover:
RewriteRule ^oldstuff\.html$ newstuff.html
This checks to see if a page named oldstuff.html was what was requested. If so, it transfers control to the file newstuff.html to generate the webpage and send it back to the client. The client (the bot or the browser) still thinks they're looking at a page called oldstuff.html. No 301.
Other notes: the ^ indicates the start of the page name, so that the rule will match oldstuff.html but notreallyoldstuff.html. The $ indicates the end of the filename, so that this rule will match oldstuff.html but notoldstuff.htmlly. That slash in the middle? Well, that 1st parameter is a regular expression (often referred to as regex), and in regular expressions, . is a wildcard that matches any single character. Preceding it with a \ is called "escaping" the character, and indicates that we don't mean the wildcard character . but rather we actually mean a period.
Now, a 301:
RewriteRule ^oldstuff\.html$ newstuff.html [R=301,L]
This is a 301 redirect. It's a redirect because we used the R flag inside the []. It's a 301 because we put=301 after the R; if we'd left that out, it would be a 302 redirect, which indicates we just temporarily moved the page, and links to it wouldn't pass any link juice. 99% of the time you're going to want to use a 301, NOT a 302.
here are two parameters inside the [] brackets, separated by a comma. That second parameter, the "L", stands for Last. It says that if the regex pattern matches the page that was just requested, then after whatever processing is done (in this case, the 301 redirect to newstuff.html) then we can skip checking the page against any of the other rules in the .htaccess file. 99% of the time you'll want to use the L flag with your 301 redirects.
92% of the time you'll want to use the L flag with your non-301 rewrites. Why not 99%?
Sometimes it's helpful to have multiple rewrite rules applied to an incoming URL. Let's say you have a number of first-level folders which you want to rewrite, plus you have a number of subfolders you want to rewrite as well...each of which occurs in all of the 3 first-level folders. You can do your main folder name substitution in one RewriteRule (preserving the next level folder as-is for now), then apply a secondRewriteRule that preserves the just-updated top folder while rewriting the next folder down.
92% of the time you'll want to use the L flag with your non-301 rewrites. Why not 99%?
Sometimes it's helpful to have multiple rewrite rules applied to an incoming URL. Let's say you have a number of first-level folders which you want to rewrite, plus you have a number of subfolders you want to rewrite as well...each of which occurs in all of the 3 first-level folders. You can do your main folder name substitution in one RewriteRule (preserving the next level folder as-is for now), then apply a secondRewriteRule that preserves the just-updated top folder while rewriting the next folder down.
Example:
Original URL:
Original URL:
- /prods/metal1/necklace-11623.htm
RewriteRule #1 might substitute /jewelry-products/ for /prods/ so now you have:
- /jewelry-products/metal17/necklace-11623.htm
RewriteRule #2 might substitute /gold/ for /metal17/ giving you:
- /jewelry-products/gold/necklace-11623.htm
Now, for bonus points, let's say we have an entire catalog of jewelry pieces in their, each with a glorious photo named [product ID].jpg. How very convenient for our database and our programmer. How terribly sucky for SEO for image search. Remember how I said that requests for images go through .htaccess as well? You can use RewriteRule to map the name of the image to something more friendly too, so that you can show Googlebot an image named something like:
- /images/necklaces/gold/amethyst-11623.jpg
Instead of the real filename:
- /images/prods/11623.jpg
Now, RewriteRule isn't the only way you can do a redirect or do an URL makeover. Next week I'll post about how to do this in your 404 error handler--there are some advantages to doing it there instead, including ease of debugging your translations, ability to translate from words in the URL to IDs by looking them up in your database, and performance benefits for large sites.
Tuesday, 15 November 2011
A guide to Following and Engaging With Your Fans on Google+ Business page
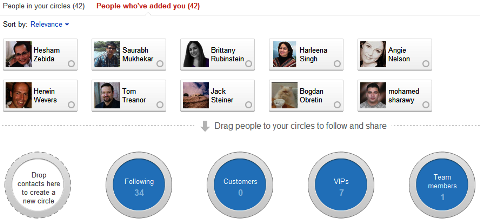
So what’s the difference between a Google+ page and a Facebook page? The big one I’ve noticed so far is the fact that you can follow your page’s fans back and add them to Circles.
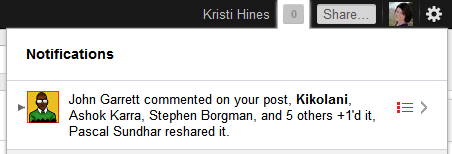
To find out who has added your page to their Circle, you can check your Notifications under Stream in the left sidebar. You can also look under your Circles > People who’ve added you area by clicking on the Circles icon.
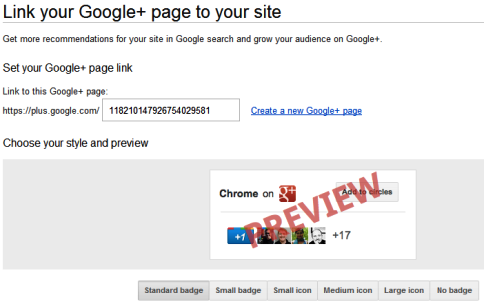
Connecting Your Google+ Page to Your Website
You can connect your website to your Google+ page using the Google+ badge configuration tool. Currently only the icons are available, but official badges are coming soon.
To find out who has added your page to their Circle, you can check your Notifications under Stream in the left sidebar. You can also look under your Circles > People who’ve added you area by clicking on the Circles icon.
In this screen, you can drag your fans into one or more of the four default circles.
- Team Members—The people you will share the inside scoop with. This could be a great way to share company news with only the people you want to see it.
- VIPs—Your most loyal customers and closest partners.
- Customers—All the people or organizations you want to build deeper relationships with. You could possibly use this Circle to send out special discounts and promotions!
- Following—People you don’t know personally but whose posts you find interesting.
Just as you can with your personal profile, you can also create new Circles.
There are a lot of ways you can successfully use your custom Circles for marketing and messaging, such as creating Circles of fans in a specific location and sharing updates with them about geo-specific offers.
Universities can create Circles for professors, alumni, undergraduate, graduate and prospective students and then share updates with them about news related to their current status with the university. The possibilities are endless.
This also means you can follow your fans’ updates, comment on your fans’ status messages, and +1 their updates as your page. The functionality for a Facebook fan page to interact with a personal profile on Facebook isn’t there, but it is in Google+. Your fans will even see your interaction with their updates in their notifications!
This, in my opinion, is going to be a very powerful way for businesses or brands to communicate with their audiences.
For example, if there is a complaint, the Google+ page can reply publicly on their page, and then privately to the Google+ user by sending a status update directly to them. With Facebook pages, the page can only reply on the wall update but not directly communicate with the Facebook use
Connecting Your Google+ Page to Your Website
You can connect your website to your Google+ page using the Google+ badge configuration tool. Currently only the icons are available, but official badges are coming soon.
Step by Step Guide : How to Set Up a Google+ Page for Your Business
Before starting, please make sure that you have a Google+ personal profile page.
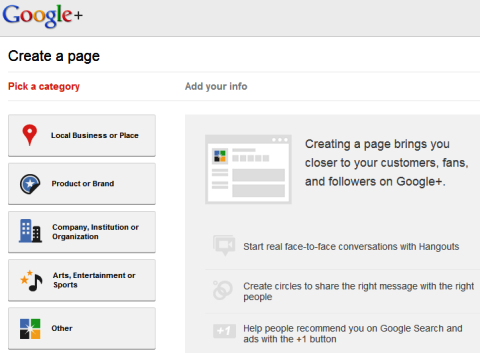
Step 1: Pick a category
So, you can see the 5 main categories. Here are the brief about each and every category:
#1: Local Business or Place
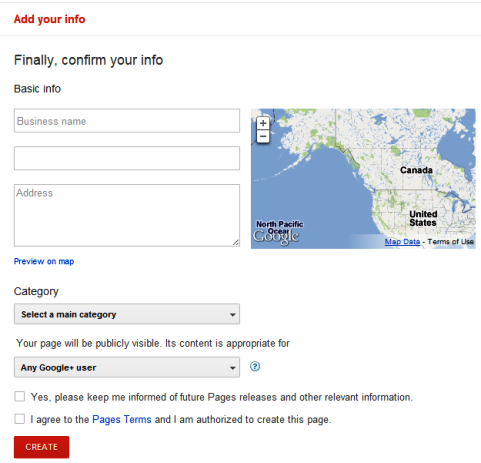
Local Business or Place includes any local business—hotels, restaurants, places, stores or services. If you choose this category, you will be asked for the country in which your business is located and the primary phone number.
If Google finds a matching result in Google Places with your phone number, it will use this information for your Google+ profile. If not, you can add your business info to Google and continue.
#2: Product or Brand
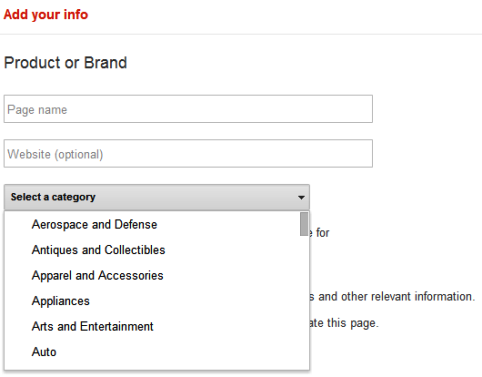
Here, you would enter your page name and website, and choose an applicable category which includes anything from Aerospace and Defense to a Website, or you can simply choose Brand, Other, Product or Service.
#3: Company, Institution or Organization
The next category, Company, Institution or Organization includes pages for companies, institutions, organizations and non-profits or similar entities. Here you also enter your page name and website, and choose an applicable category with the same options as a Product or Brand page, or you can simply choose Company, Institution, Organization or Other.
#4: Arts, Entertainment or Sports
Pages for movies, TV, music, books, sports and shows are considered a good fit for the Arts, Entertainment or Sports section. Again, you will enter your page name and website, and choose an applicable category—this time with options ranging from Album to Website, or you can simply choose Entertainment, Other or Sports.
#5: Other
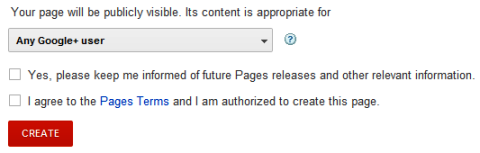
If you don’t feel your page fits in any of the above-mentioned categories, you can simply select Other, where you can enter your page name and website without any additional narrowing of category selection. For pages in any category, you must also choose whether your page’s content is suitable for any Google+ user, users 18 or older, users 21 or older or specifically note that the content will be alcohol-related. Then you will tick boxes to opt-in to updates for Google+ pages and agree to terms and conditions to continue.
Your Business page on the Google + is been made. Now you must be thinking how to customize it.
Customize Your Page’s Public Profile
#1: Add Your Profile Photo and Tagline
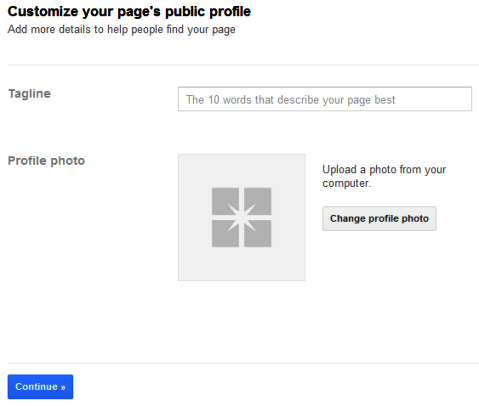
First, you will be asked to add your tagline (the 10 words that best describe your page) and your page’s profile photo.
After you have added these items and clicked on Continue, you will be asked to spread the word about your new page through your personal Google+ profile. If you’re not ready yet (which you probably aren’t, since you haven’t completed your profile), click on Finish to be taken to your new page.
#2: Editing Your Page Information
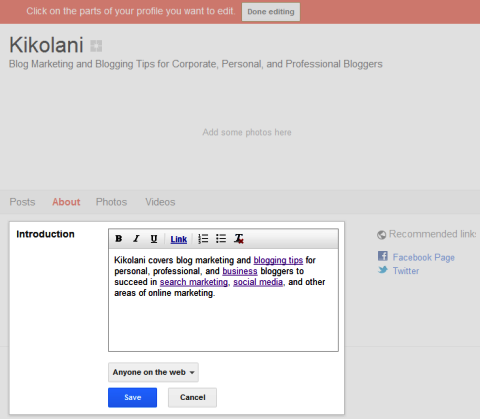
Once you’ve perused your page’s welcome screen, you will want to edit your page’s information. Go to your page’s profile by clicking on the Profile icon at the top, left of the Search Google+ box. Then go to your About tab and Edit Profile.
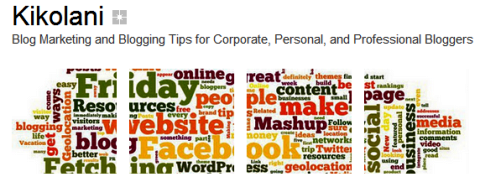
It’s similar to the five photos you can have on your Facebook page. While editing your profile, click on the photo area where it says “add photos here” and upload a photo in each of the five photo spots. You can use different photos that represent your business or creatively cut one photo into five pieces and spread it across the area.
Congratulations! Your Google+ Page Is Ready.
Once your profile is ready, you can start posting to your profile by adding status updates, links, photos and videos just like you do on your personal Google+ profile. I would suggest writing a post or two before you use the “Spread the word” option in your right sidebar to announce your page to your personal profile connections.
Step 1: Pick a category
So, you can see the 5 main categories. Here are the brief about each and every category:
#1: Local Business or Place
Local Business or Place includes any local business—hotels, restaurants, places, stores or services. If you choose this category, you will be asked for the country in which your business is located and the primary phone number.
If Google finds a matching result in Google Places with your phone number, it will use this information for your Google+ profile. If not, you can add your business info to Google and continue.
#2: Product or Brand
Here, you would enter your page name and website, and choose an applicable category which includes anything from Aerospace and Defense to a Website, or you can simply choose Brand, Other, Product or Service.
#3: Company, Institution or Organization
The next category, Company, Institution or Organization includes pages for companies, institutions, organizations and non-profits or similar entities. Here you also enter your page name and website, and choose an applicable category with the same options as a Product or Brand page, or you can simply choose Company, Institution, Organization or Other.
#4: Arts, Entertainment or Sports
Pages for movies, TV, music, books, sports and shows are considered a good fit for the Arts, Entertainment or Sports section. Again, you will enter your page name and website, and choose an applicable category—this time with options ranging from Album to Website, or you can simply choose Entertainment, Other or Sports.
#5: Other
If you don’t feel your page fits in any of the above-mentioned categories, you can simply select Other, where you can enter your page name and website without any additional narrowing of category selection. For pages in any category, you must also choose whether your page’s content is suitable for any Google+ user, users 18 or older, users 21 or older or specifically note that the content will be alcohol-related. Then you will tick boxes to opt-in to updates for Google+ pages and agree to terms and conditions to continue.
Your Business page on the Google + is been made. Now you must be thinking how to customize it.
Customize Your Page’s Public Profile
#1: Add Your Profile Photo and Tagline
First, you will be asked to add your tagline (the 10 words that best describe your page) and your page’s profile photo.
After you have added these items and clicked on Continue, you will be asked to spread the word about your new page through your personal Google+ profile. If you’re not ready yet (which you probably aren’t, since you haven’t completed your profile), click on Finish to be taken to your new page.
#2: Editing Your Page Information
Once you’ve perused your page’s welcome screen, you will want to edit your page’s information. Go to your page’s profile by clicking on the Profile icon at the top, left of the Search Google+ box. Then go to your About tab and Edit Profile.
Here you will be able to click on everything from your page name to your links to enter relevant information about your page within Introduction, Hours (for local businesses or places), Website and Contact Info (phone, email, Skype, etc.). Also be sure to enter additional links to your page in the Introduction section using the Link button and under Recommended Links to link to your other social profiles, blog, blog posts and so on.
#3: Adding Your Photostrip
Last but not least when it comes to your Google+ page design is filling in your photostrip. These five photos will be displayed underneath your page’s name and tagline.
It’s similar to the five photos you can have on your Facebook page. While editing your profile, click on the photo area where it says “add photos here” and upload a photo in each of the five photo spots. You can use different photos that represent your business or creatively cut one photo into five pieces and spread it across the area.
Congratulations! Your Google+ Page Is Ready.
Once your profile is ready, you can start posting to your profile by adding status updates, links, photos and videos just like you do on your personal Google+ profile. I would suggest writing a post or two before you use the “Spread the word” option in your right sidebar to announce your page to your personal profile connections.
Monday, 14 November 2011
Mobile ad performance in Google Analytics.
As more consumers begin to make use of tablets or high-end mobile devices, businesses need to understand this shift towards mobile and adapt your marketing mix. This mobile ads reporting enhancement in Google Analytics will help you make more sense of how mobile advertising interacts with your business.
Wednesday, 9 November 2011
Monday, 7 November 2011
Account Planners in Ad Agencies - What they are for?
It's been four decades since Account Planning came into being.
It possibly was the most fundamental step in the evolution of advertising into communication tool for today's business. After 40 years, has the time come to evolve the planning function? More importantly, has the time come to even dump the tag?
We all know that Stephen King and Stanley Pollitt working in two different agencies in two different agencies invented the concept of account planning. Both of them were concerned with enormity of freedom given to servicing executives in writing a creative brief. Both also felt that the amount of data available was either not used properly, or was not used at all. Effectively then they created a new function which borrowed from Account Management and from Media Planning. The function got called "Account Planning" as a merged entity. If you haven't, then you must read the highly recommended Mary Baskin's article on www.apg.org.uk.
The business of communication is transforming
The Planner's role since then has evolved from being a researcher, data miner, insight generator and keeper of the brief to knowledge keeper, brainstorm facilitator, soothsayer, and futurist to being a thought leader.
Two other interesting developments have happened around the same time. One the Market Research industry has progressed leaps and bounds. Given the expansion of markets and increasing globalization need for actionable real time data has become a key ingredient in strategy formulation. Research techniques have become complex and the coming of internet have only added to complexity.
Two, media as a function is no longer a part of advertising agency. They are now stand alone experts. Media data too is a complex maze, and the media agencies work with research agencies directly, cutting the account planner completely from the process. To add to it, the media agencies are now investing in consumer insights to make media work sharper and with greater efficiency.
Planning's importance has overshadowed Servicing's role
Over the four decades since it came into existence, Account Planning has attracted best of minds all over the world. They have had a huge impact both on the agency brands and on the client brands. The planners have become role models and magnets for new talent. They have achieved what possibly both Stephen King and Stanley Pollitt might have wanted them to achieve. Be the alter ego to creative, be the ones who add relevance to creative process, and be the ones who make communication efficacious. I am not sure if the founding fathers wanted Account Planners to become the new icons, and Account Planning to become the magnet it has started to become.
In the process the strong role of servicing has been weakened significantly. There is a sharp definition of role of creative, and there is a clear importance of role of planning, this has left servicing in an almost unknown territory. There is enough chatter on how new talent that comes into industry is unwilling to join servicing.
Why is this apathy for Account Servicing roles growing?
Account Planning cannot live isolated from Account Servicing
I personally believe that the reasons why the function called Account Planning was invented do not exist any longer. Over a period of time Planners have used the power of knowledge to become powerful in the system; this has only harmed the profession.
There is enormous amount of data available, and frankly both media and research are doing a good job of synthesizing the data and feeding it into communication development process. Yes the Planner is expected to add the consumer dimension to the creative development process, but there is no reason to believe that the servicing cannot do the same. Yes the planner has to be the knowledge leader and a thought leader; there is no reason to believe that the servicing person cannot be one.
Most successful agency leaders are not Account Planners by training, but they would have made good planners if they wanted to
Account Planning needs to move on
It's time to burry Account Planning, and also burry Account Servicing. Both functions are past their expiry date. The future should belong to Brand Evangelists. The new function need to merge the rigour of Planning with the drive of Servicing. This new singular entity needs to be a curator that mashes relevant knowledge, plays the soothsayer, inspires the process and brings the magic back. The future of communication business is far more complex and layered then it ever has been. The old rules have stopped working; new ways need to be crafted.
Account Planning is existing form is in serious danger of losing relevance; it needs to transform into a true leadership function.
It needs to set the agenda for future, and run it too.
Thursday, 3 November 2011
How a hashtag can help you drive traffic ? An example
1. Send out a tweet with a hashtag and a link:
2. Initially it’s viewable in the home feeds of followers:
5. And to top it off, search engines index tweets so they may show up in search results:
*This article was originally posted by Laura Lippay in http://www.yadvertisingblog.com
2. Initially it’s viewable in the home feeds of followers:
3. It also gets visibility in feeds for anyone following the #SEO hashtag:
4. Additionally, it gets visibility in Twitter search for people searching for SEO:5. And to top it off, search engines index tweets so they may show up in search results:
How to get visibility for your tweets
Here is a quick and easy list of tactics you can employ to get the most out of your tweets.
- Use hashtags wisely. That’s the “#” symbol. Put a hashtag on a word or two in your tweet that is topically relevant to the tweet. Don’t overdo it or people won’t want to read your tweets at all. This allows your tweet to appear in the feeds of people following that hashtag topic.
- Use keywords. Instead of tweeting “Check out this video”, tweet “Check out Zuckerberg announcing the new #Facebook features at #f8.” Anyone searching for or following Zuckerberg and/or Facebook and/or f8 will be able to potentially see your tweet.
- Tweet about hot topics. When topics are hot, like earthquakes, company shakeups and new product releases, people will search for those topics. Tweet about what’s hot (and of course relevant to you and your audiences) and you may get in front of hundreds, thousands or even millions of people searching.
- Study your data. Take note of your tweets that get the most clicks and/or retweets. What language did you use? What topics are popular? What time of day do people retweet you the most? Use tools likeTwoolr for when you are retweeted the most, and Topsy for tweets that got the most retweets.
- Link to your site from your tweets. Again, don’t overdo this one (you don’t want to come off as self-centered), but do link to your site when promoting content on your site. Use URL shorteners like Bit.ly to allow for more text space in your tweet and to be able to track your link data.
- Link to Twitter from your site. This seems like a no-brainer, but too many people forget this part. Make sure to promote your Twitter account on your website. A Razorfish brand study showed that 23.5% of people follow a brand on Twitter because they are a current customer. Don’t pass up a simple opportunity to engage them.
- Link to your Twitter from Facebook. If people like you on Facebook they might also want to follow you on Twitter. Let them know you’re there with a link to your Twitter feed from your Facebook page. Also link to your website from both your Facebook page and your Twitter profile.
*This article was originally posted by Laura Lippay in http://www.yadvertisingblog.com
Wednesday, 2 November 2011
8 Steps - Local Business listing or Google places
Step 1: Include Basic Business Information
This includes filling out the required fields such as Country, Company/Organization, Street Address, City/Town, State, ZIP, Main Phone, and Fax numbers.
Make sure you use the actual DBA (Doing Business As) name for your company and that your address information is reflective of your actual address. Fill out the fields as accurately as possible, since Google will attempt to cross-reference them with information from other business databases that mention your company.
Step 2: E-mail, Description, and Address Display Options
1. Use an e-mail address that is associated with your website domain such as info@yourdomain.com
2. Use the 200-character limit in the description to accurately describe your business including product and service areas where possible. The business description should answer the following questions:
· Who are you?
· What do you do?
· Where are you located? Where areas do you cover?
3. Fill in your website details. If you do not have a website, it's best to at least have a one page website freely available through any of the many free website builders.
Step 3: Business Category Selection
Selecting the right categories can make or break your chance at ranking prominently within Google's 7-pack, that is, their list of seven similar businesses and organizations in your area.
Google offers one main category and four related categories to help define your services. Start typing in the main categorization of your business and you'll find that Google Places will suggest a category for you choose. Choose the most appropriate suggestion as your main category and then proceed to fill in related categories or other services your business offers.
In the past, you may have heard that it is a good idea to stuff city or location keywords into your categories. While this was true last year, it is no longer effective and can even be detrimental to your rankings.
If the suggested keywords do not match your business services appropriately, you can you use custom categories. Employ thisBlumenthal's Google LBC Categories Preview tool to find synonyms that are recognized by Google Places. For example, identified synonyms for the suggested category "Lawyers" include:
| attorney attorneys defense DUI family law | findlaw law firm law firms lawyer pro bono |
Step 4: Service Areas
In recent months, Google Places has offered the option for businesses to define their service areas. This is especially useful, at least in theory, for mobile businesses such as plumbers, roofers, and other contractors, and home-based businesses. Unfortunately, Google Places still places more trust in brick and mortar based businesses than mobile businesses. Our testing has proven that selecting service areas results in a sharp drop in rankings. As per Google Place guidelines however, this is the only way for mobile or home-based business to represent itself on Google Places.
Google Places also offers the option to hide your business address completely, in case you want to keep your business address private.
Step 5: Hours of Operation and Payment Options
Filling these details out accurately will help you get closer to a 100% complete Google Places listing. You can also select split hours in case your business is open at different times during each day.
Step 6: Images and Videos
Adding images and videos not only helps your local business listing become more interactive, it also counts toward a 100% complete listing.
Make use of this option and upload some of your business related photos. They can help your customers get an idea of what to expect when they visit or call you. For example, if you are a real estate agent, you can upload pictures of some of the recent properties that you have sold. Be sure you upload 10 images to help make your profile complete.
You can also upload business videos to your local business profile. These can be promotional videos, company messages, and DIY or how-to videos for your customers. Google Places gives you an option to showcase up to five videos. While more videos provide increased interactive content for your customers, only one video contributes towards profile completeness.
Step 7: Additional Details
This section allows you to provide all additional details you wish to tell your customers about your business. You may add multiple fields, but only one is needed to count towards profile completeness. Example fields where you may add appropriate keywords include options such as parking availability, free estimates or quotes, or awards your business may have won.
A rarely known fact is that you can also add links in your local business listing to your Twitter or Facebook pages. Just add a field called "Follow us on Twitter" or "Follow us on Facebook" and copy the full URL for your Facebook or Twitter Profile into the field on the right hand side.
Step 8: Review and Submit Your Listing
Re-check your listing data to check for accuracy, then click the submit button to save your changes. In about an hour or so -- and sometimes faster than that -- Google Places will have picked up your listing. If you are in an non-competitive market, you may already have a place in the 7-pack of local business results. If you don't show up on the first page don't be discouraged, because in my next article, I'll explain how to building citations or "links to your listings" that can strongly impact your rankings.
Subscribe to:
Posts (Atom)