Step 1 – Install Static iFrame Tab App
Click on this link and install the Static iFrame Tab App just click on Install Page Tab.

Step 2 – Configure the Static iFrame Tab App Edit the favorite by clicking on it, after clicking on it authorize the tab applications.

Step 3: You will get this screen, start choosing the fields that you need

Now here are the things you can do with :
Starting with the first:
1. Enable Timeline 810px Wide Mode (New!): You can enable or disable it
2. Tab Image : This will help you in choosing the image for the tab
3. Page Source: This will help you to load the information in the iFrame (when someone clicks the tab the iFrame opens, so select the proper radio button and the relevant information will appear)
URL Redirect Image HTML
URL: If you enter a URL , this will open that webapge/microsite in the iFrame
Redirect: The user's entire browser window will leave your page tab and be redirected to the URL you specify

This is how your new tab will look like on FB.

Now keep on adding as many tabs as you like (Total of 12 tabs including one Photo tab which cannot be repositioned or displaced from its original position)
Click on this link and install the Static iFrame Tab App just click on Install Page Tab.

Step 2 – Configure the Static iFrame Tab App Edit the favorite by clicking on it, after clicking on it authorize the tab applications.

Step 3: You will get this screen, start choosing the fields that you need


Now here are the things you can do with :
Starting with the first:
1. Enable Timeline 810px Wide Mode (New!): You can enable or disable it
2. Tab Image : This will help you in choosing the image for the tab
3. Page Source: This will help you to load the information in the iFrame (when someone clicks the tab the iFrame opens, so select the proper radio button and the relevant information will appear)
URL Redirect Image HTML
URL: If you enter a URL , this will open that webapge/microsite in the iFrame
Redirect: The user's entire browser window will leave your page tab and be redirected to the URL you specify
Image : Select an image to upload (max size: 810px wide by 1200px tall, 400kb)
HTML: You can simply paste the text over here with an option of modifying of changing the font size, colour, style etc
4. Friend-Gate :Three options:
Off Default HTML
Off :Friend-gate is turned off. Visitor's friends do not need to be fans to access your content.
Default :
Number of friends who must like this page:
(1-100)
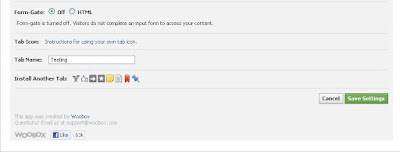
5. Form-Gate: 2 options Off HTML
Off : Form-gate is turned off. Visitors do not complete an input form to access your content.

Now keep on adding as many tabs as you like (Total of 12 tabs including one Photo tab which cannot be repositioned or displaced from its original position)
No comments:
Post a Comment