Wednesday, 11 April 2012

A Visual guide- How to create Custom tabs for New facebook Timeline

Step 1 – Install Static iFrame Tab App


Click on this link and install the Static iFrame Tab App just click on Install Page Tab.


Step 2 – Configure the Static iFrame Tab  App Edit the favorite by clicking on it, after clicking on it authorize the tab applications.


Step 3: You will get this screen, start choosing the fields that you need


Now here are the things you can do with :


Starting with the first: 


1. Enable Timeline 810px Wide Mode (New!): You can enable or disable it


2. Tab Image : This will help you in choosing the image for the tab


3. Page Source: This will help you to load the information in the iFrame (when someone clicks the tab the iFrame opens, so select the proper radio button and the relevant information will appear)
 URL  Redirect  Image  HTML


URL: If you enter a URL , this will open that webapge/microsite in the iFrame


Redirect: The user's entire browser window will leave your page tab and be redirected to the URL you specify


Image : Select an image to upload (max size: 810px wide by 1200px tall, 400kb)

HTML: You can simply paste the text over here with an option of modifying of changing the font size, colour, style etc

4. Friend-Gate :Three options:

 Off  Default  HTML


 Off  :Friend-gate is turned off. Visitor's friends do not need to be fans to access your content.

 Default : 
Number of friends who must like this page: 
 (1-100)

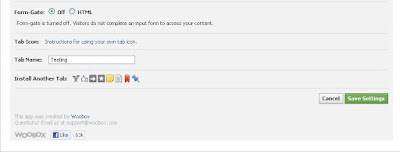
5. Form-Gate: 2 options  Off  HTML

 Off : Form-gate is turned off. Visitors do not complete an input form to access your content.


This is how your new tab will look like on FB.


Now keep on adding as many tabs as you like (Total of 12 tabs including one Photo tab which cannot be repositioned or displaced from its original position)




Tuesday, 10 April 2012

A Brave Print Campaign by Indya.com


SEO detailed infographic


Tutorial on How to Optimize Facebook Timeline- Visually

According to the new Facebook Timeline, there are 5 areas where you can visually optimize the timeline for a better visual effect. They are as follows:

1. Cover photo
2. Profile picture
3. Custom tab images
4. Highlighting posts
5. Milestones

Here are the sizes along with the sample:

Cover Photo: 851*315 px
Profile Picture: 125*125px
Custome Tab images: 111*74px


1. Now lets start with the Cover Photo 


What you should do?

  • Use a unique image that represents your page
  • Be creative and Experiment a lot of things
  • Use the cover photo to bring a strong visual impact to your page by extending your brand with lifestyle imagery, product images or a description of your services.
What you should not do?

§  No promotions, coupons or advertisements
§  It shouldn’t be primarily text-based or infringe on anyone else’s copyright
§  No price or purchase information, such as “40% off” or “Download it at our website”
§  No contact information, such as web address, email, mailing address or other information intended for your page’s About section
§  No references to user interface elements, such as Like or Share, or any other Facebook site features
§  No calls to action, such as “Get it now” or “Tell your friends”


2. Lets talk about 'The Profile Picture'

Although the profile picture is displayed at 125 x 125 pixels, Facebook requires that the image you upload be 180 x 180 pixels, which it then resizes. And, of course, make sure your profile picture graphic is a square.

3: Custom Tab Images

This is a new initiative from the FB wherein the tabs has been moved from left and is place on the top just below the cover pic.

What is changed here?

(i)The old 16*16 pixel icons in the tab has been replaced by 111*74
(ii) Maximum of 4 tabs can be displayed prominently including the 'Photo tab'
(iii) Name of the tab will be below the respective tab
(iv) The Photo tab cannot be replaced, it is fixed. You can play with the other 3 tabs
(v) If you use lesser tabs, say only 2 tabs then the Info tab occupies the remainign area
(vi) You can create your own graphics for any custom tab images EXCEPT Facebook’s own apps (Photos, Notes, Events, Videos, Links).

4. Highlighting

You can use the Highlight' feature to create Visual differentiation. When you highlight a page status, it then occupies two columns in your Timeline.

5. Milestones (843 x 403)

Brands can create Milestones—incorporating pictures and text—for various significant events in their histories. Milestones can be used to visually organize the content and keep users on the Page with great archival photos.


6. Images


Maximize the images you post regularly - they will display as 404 x 404 pixels.

Kingfisher- Fly now pay later (What's your opinion)


Monday, 2 April 2012

Fantastic Campaign by Red Bull (Energy Drink) based on Corporate Chamchas :)


According to AFAQS


"The campaign, designed around the thought 'Why climb the career ladder, when you can fly!' is currently active on social media platforms such as Facebook and YouTube and showcases how the energy drink can enhance performance at work.

Energy drink Red Bull has launched a campaign to appeal to the ambitious streak of people who want to climb the corporate ladder through performance. It poses Red Bull as a drink that helps them to reach this goal, as the active ingredients in it enable one to give peak performance and thus rise to the top. The essence of the entire campaign is captured in the line: 'Why climb the career ladder when you can fly!'.
The campaign, which has a strong focus on the digital medium, is a tongue-in-cheek take on the Indian corporate culture, where a corporate 'chamcha' is ready to do anything to climb the career ladder. As part of the campaign, Red Bull has launched a viral video on YouTube. Titled 'Corporate Chamcha', the film shows how ridiculous it is to be a 'chamcha' and presents an alternate way to reach the top.
The insight of the idea is that drinking Red Bull keeps one sharp and enhances performance, so one need not be a 'chamcha' to be professionally successful. The film has been made by Delhi-based agency, The Brewhouse."

Here are few screenshots:

Redull has created a subdomain and hosted it here

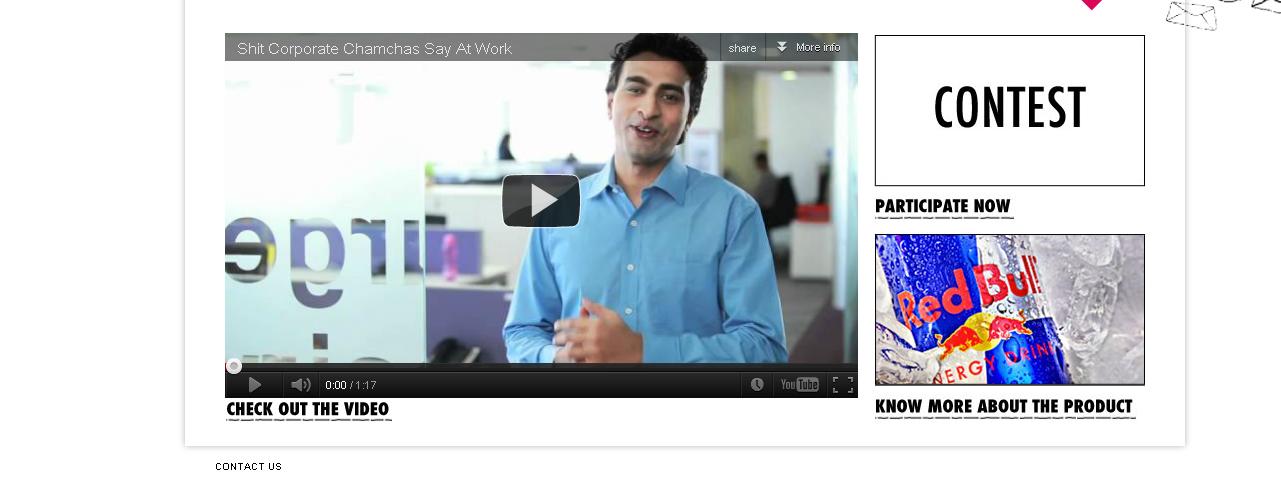
This is how the Homepage looks like


Click on start and this screens opens up which guides you ..


You are given a task to perform 


When you click 'Start' the game starts


Game Ends with some information(Passed/Fail) with comments


                                                  Even if you don't win, there is another chance to play and win ;)


Cheers

Thursday, 29 March 2012

Now share Personalized Dashboards with clients

Customers do not always understand how to read the results from web analytics products and see a tangible return on their investments. It's hard to show them without time consuming meetings. Web agencies often rely on Excel and Word to create analytics reports for clients. It’s a manual process that involves a lot of copy and pasting. Yet an agency’s main value-add isn’t report creation, but analyzing data and providing key findings and recommendations to clients.


How does it works?


1. Sign up for DashThis and authorize them to hook into your Google Analytics
2. They pull the needed Google Analytics data for your dashboards
3.Thy will scan through your Analytics profile and build your Executive Dashboard
4.Then they adapt your dashboard to your specific needs

Here are few screenshots:


Thursday, 22 March 2012

A Guide to create Viral Marketing elements

As we have seen that there are lot of Viral Videos on Social networking websites like Facebook and other sites as well, let us analyze how we can create static elements that can go viral. These Elements are called MEME

These are some good and entertaining MEMES


What do you need?

Any one of the following:

1. Photoshop : Well don't worry, if you don't know the photoshop, you can use the following free tools to create free viral elements: http://memegenerator.net/ or http://www.quickmeme.com

Before you start crating the MEMES, please consider the following:
1. Know your audience for which you are creating the MEMES
2 Study the existing MEMES which have got good response. Also study the experts who have created it.
3. Make several drafts and doa  thorough check
4. Ask for feedback from your tam/friends and family
5. Enjoy and Have fun- Be in a +ve mood when you are creating it so that you can make others happy :-)

Now how to spread it?
 Use Facebook, Twitter, Stumbleupon, Pinterest, Reddit, Tumblr. Feel free to use other mediums like Blogs, emailers , print or any other medium which includes but not limited to, Offline as well

Enjoy!!!!

Friday, 16 March 2012

Tracking IFrames through Google Analytics

Step 1: Create a Facebook iFrame tab and get the URL. Something like this:

 http://www.facebook.com/example.in?sk=app_180487048663627

Step 2: Link it to your Facebook iFrame page placed on your Domain:

www.domain.com/facebook

Step 3: Please remove the formatting in red and replace it with your Google analytics id
1.    <script type="text/javascript">
2.     
3.    var FacebookURL = 'http://www.facebook.com/YourFacebookPage?sk=app_123456789';
4.     
5.    var _gaq = _gaq || [];
6.    _gaq.push(['_setAccount', 'UA-XXXXXX-X']);
7.    _gaq.push(['_addIgnoredRef', 'static.ak.facebook.com']);
8.     
9.    // If Google Analytics is loaded and this page isn't framed inside our Facebook URL, frame the page.
10.  if (_gaq.push && self.location == top.location) {
11.  // Create a fake URL that we can filter in Google Analytics. This pageview also sends the traffic source data to Google Analytics.
12.  _gaq.push(['_trackPageview','/facebook/campaign-tracking/']);
13.  // Tracking done, let's frame the page
14.  setTimeout(top.location.href = FacebookURL, 200);
15.  } else if (self.location == top.location) {
16.  // If Google Analytics doesn't load within 2 seconds, refresh and frame the page anyway. People dislike waiting. Change the time if you like.
17.  setTimeout(top.location.href = FacebookURL, 2000);
18.  } else {
19.  // The Page is Framed. Let's track it.
20.  _gaq.push(['_trackPageview']);
21.  _gaq.push(['_trackPageLoadTime']);
22.  }
23.   
24.  (function() {
25.  var ga = document.createElement('script'); ga.type = 'text/javascript'; ga.async = true;
26.  ga.src = ('https:' == document.location.protocol ? 'https://ssl' : 'http://www') + '.google-analytics.com/ga.js';
27.  var s = document.getElementsByTagName('script')[0]; s.parentNode.insertBefore(ga, s);
28.  })();
29.  </script>

Monday, 5 March 2012

Optimizing Youtube Channel- Tips

1.  Have a list of relevant keywords ready for which you want to be found in a search.  Local businesses should have a list with their locations in the phrase and a list without those geographic modifiers.

2.  Pick a relevant search term as your channel name. If you're a local business, I would choose something with a location in the name, like Houston Montrose Hardware.  Make sure that you complete the Channel Tags section with relevant keywords in quotation marks.

3.  Do a search for other videos using your keyword list.  Find videos with more than 20,000 views.  Add a few of those to your "Favorites" list.

4.  Then begin to search for videos to add to your Playlists.  When you find a video that you like in your keyword search, add it to a new playlist, and name the playlist with your keyword phrase.

At some point, you'll want to begin to upload your own videos. Here are the 10 best strategies to optimize video on YouTube for more traffic:

1.  Title:  In the Title section, be sure to use keywords by which you want to be found. 

2.  Description:  In the description, make sure that what appears first is the full URL of your web site that you want to promote, followed by a description that also contains keywords.

3.  Tags:  In the tags section, enter keywords here, but each keyword will need to be enclosed in quotation marks, like "Redondo Beach Wedding Florist" "Malibu Wedding Flowers".

4.  Category:  Choose the best category for your video and make your video public.

5.  Maps:  If you're a local business, you'll then click on Maps and select a location for your video (ideally it's your physical address) and then save changes.

6.  Settings:  In your Channel settings, choose to autoplay your featured video, which will be the last video you uploaded, unless you pick a different one. The newly uploaded video should begin to play automatically when someone arrives at your channel.

7.  Sharing:  Bookmark, Like, Favorite and Share Your Videos from your channel page, not from the videos list.

8.  Captions and Subtitles:  For extra indexing opportunities and ADA compliance, submit transcriptions or closed-caption tracks for each video through the "Captions and Subtitles" tab.

9.  Getting Subscribers:  Ask your clients, friends, colleagues, etc. to subscribe to your channel, add themselves as friends, or comment on your channel.

10.  Change Playlist:  Once you have uploaded a number of videos, you may want to change your settings so that your channel displays only your own videos.